datetime:2023/11/01 10:06
author:nzb
该项目来源于大佬的动手学ROS2
6.做个遥控车-订阅ROS2 Twist
本节我们结合上一节电机控制以及前面章节的MicroROS话题订阅部分知识点,来实现一个可以用键盘遥控的小车。
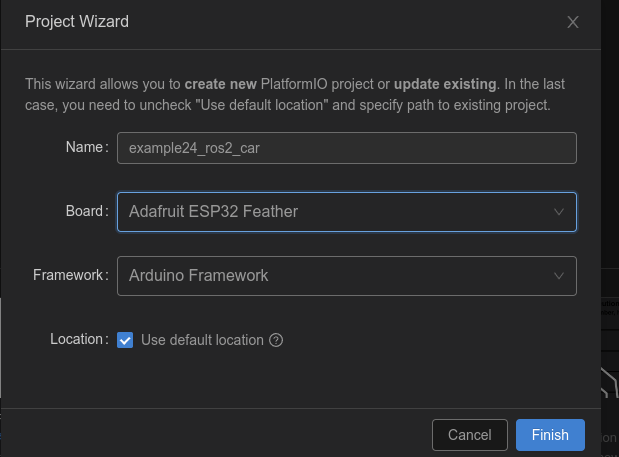
一、新建工程
新建工程example24_ros2_car
修改配置
[env:featheresp32]  ; 这是一个环境配置标签,指定了代码将运行的硬件平台和框架
platform = espressif32  ; 指定了使用的平台为Espressif 32
board = featheresp32  ; 指定使用的硬件板为Feather ESP32
framework = arduino  ; 指定使用的框架为Arduino
board_microros_transport = wifi  ; 指定使用的Micro-ROS传输方式为Wi-Fi
lib_deps = ; 列出所有依赖库的URL,这些库将被下载和安装
    https://github.com/fishros/Esp32McpwmMotor.git  ; ESP32-MCPWM-Motor库,用于驱动电机
    https://gitee.com/ohhuo/micro_ros_platformio.git  ; Micro-ROS平台库,用于在ESP32上运行ROS 2
二、编写代码
#include <Arduino.h>
#include <Esp32McpwmMotor.h>
#include <Arduino.h>
#include <micro_ros_platformio.h>
#include <WiFi.h>
#include <rcl/rcl.h>
#include <rclc/rclc.h>
#include <rclc/executor.h>
#include <geometry_msgs/msg/twist.h>

// 定义 ROS2 执行器和支持结构
rclc_executor_t executor;
rclc_support_t support;
// 定义 ROS2 内存分配器
rcl_allocator_t allocator;
// 定义 ROS2 节点和订阅者
rcl_node_t node;
rcl_subscription_t subscriber;
// 定义接收到的消息结构体
geometry_msgs__msg__Twist sub_msg;

// 定义控制两个电机的对象
Esp32McpwmMotor motor;

// 回调函数,当接收到新的 Twist 消息时会被调用
void twist_callback(const void *msg_in)
{
  // 将接收到的消息指针转化为 geometry_msgs__msg__Twist 类型
  const geometry_msgs__msg__Twist *twist_msg = (const geometry_msgs__msg__Twist *)msg_in;
  // 从 Twist 消息中获取线速度和角速度
  float linear_x = twist_msg->linear.x;
  float angular_z = twist_msg->angular.z;
  // 打印接收到的速度信息
  Serial.printf("recv spped(%f,%f)\n", linear_x, angular_z);
  // 如果速度为零,则停止两个电机
  if (linear_x == 0 && angular_z == 0)
  {
    motor.updateMotorSpeed(0, 0);
    motor.updateMotorSpeed(1, 0);
    return;
  }

  // 根据线速度和角速度控制两个电机的转速
  if (linear_x > 0)
  {
    motor.updateMotorSpeed(0, 70);
    motor.updateMotorSpeed(1, 70);
  }

  if (linear_x < 0)
  {
    motor.updateMotorSpeed(0, -70);
    motor.updateMotorSpeed(1, -70);
  }

  if (angular_z > 0)
  {
    motor.updateMotorSpeed(0, -70);
    motor.updateMotorSpeed(1, 70);
  }

  if (angular_z < 0)
  {
    motor.updateMotorSpeed(0, 70);
    motor.updateMotorSpeed(1, -70);
  }
}

void setup()
{
  // 初始化串口
  Serial.begin(115200);

  // 初始化两个电机的引脚
  motor.attachMotor(0, 22, 23);
  motor.attachMotor(1, 12, 13);

  // 设置 micro-ROS 通信参数,连接到指定的 ROS2 代理
  IPAddress agent_ip;
  agent_ip.fromString("192.168.2.105");
  set_microros_wifi_transports("fishbot", "12345678", agent_ip, 8888);
  delay(2000);

  // 初始化 ROS2 执行器和支持结构
  allocator = rcl_get_default_allocator();
  rclc_support_init(&support, 0, NULL, &allocator);
  // 初始化 ROS2 节点
  rclc_node_init_default(&node, "esp32_car", "", &support);
  // 初始化订阅者
  rclc_subscription_init_default(
      &subscriber,
      &node,
      ROSIDL_GET_MSG_TYPE_SUPPORT(geometry_msgs, msg, Twist),
      "/cmd_vel");
  rclc_executor_init(&executor, &support.context, 1, &allocator);
  // 设置订阅的回调函数
  rclc_executor_add_subscription(&executor, &subscriber, &sub_msg, &twist_callback, ON_NEW_DATA);
}

void loop()
{
  rclc_executor_spin_some(&executor, RCL_MS_TO_NS(100)); // 循环处理数据
}
代码使用 Esp32McpwmMotor 库初始化电机,设置 micro-ROS 通信参数以连接到 ROS2 代理,并初始化一个 ROS2 节点和一个订阅者,以订阅 /cmd_vel 主题上的 Twist 消息。
当接收到新的 Twist 消息时,调用 twist_callback() 函数提取线性和角速度,并相应地控制电机。如果两个速度都为零,则电机停止。否则,根据方向设置电机速度。在正向方向上,速度设置为 70,在反向方向上为 -70。
loop() 函数重复调用 rclc_executor_spin_some() 来处理来自 ROS2 网络的传入数据。
需要注意的是,你要根据自己的网络情况修改下面的代码以实现无线通信,如果不知道怎么设置,请回看前面章节。
agent_ip.fromString("192.168.2.105");
set_microros_wifi_transports("fishbot", "12345678", agent_ip, 8888);
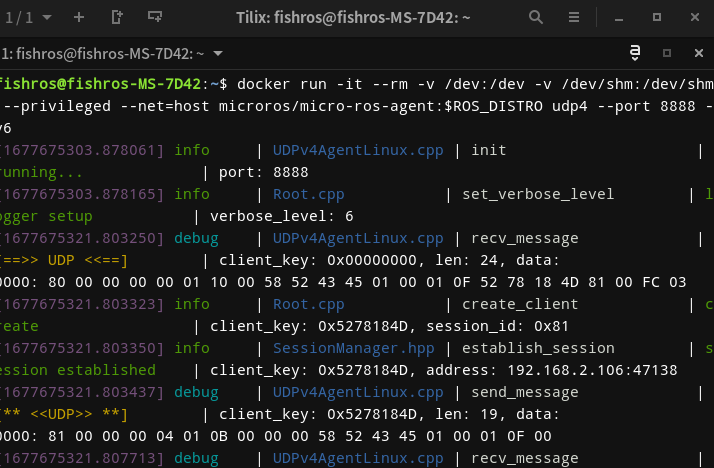
三、下载测试
将代码下载到小车,运行agent,点击RST等待接入。
sudo docker run -it --rm -v /dev:/dev -v /dev/shm:/dev/shm --privileged --net=host microros/micro-ros-agent:$ROS_DISTRO udp4 --port 8888 -v6
接着我们使用ROS 2的键盘控制节点来进行控制测试
ros2 run teleop_twist_keyboard teleop_twist_keyboard
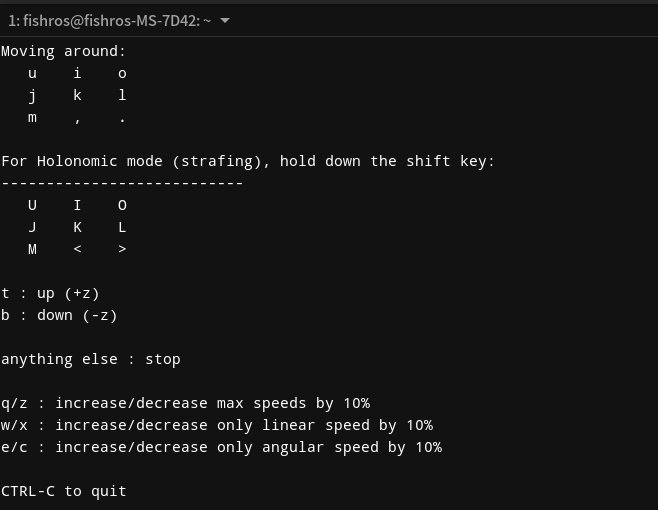
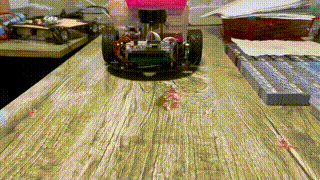
接着按下入JKL,几个按键,看一下小车是否动了起来。
四、总结
本节我们通过将小车接入MicroROS完成了一个遥控小车的开发。下一节我们开始使用编码器来测量轮子的转速。