datetime:2023/10/26 10:23
author:nzb
该项目来源于大佬的动手学ROS2
4.榨干性能-使用双核运行MicroROS
在硬件篇开始的第一节时,曾提到,我们所使用的开发板单片机是双核240M主频的,但是在后面的开发中我们并没有真正的使用了双核,主频也是使用的默认160MHZ。
所以本节带你一起带你一起提升主频并启动双核进行MicoROS的双核。
一、双核与RTOS介绍
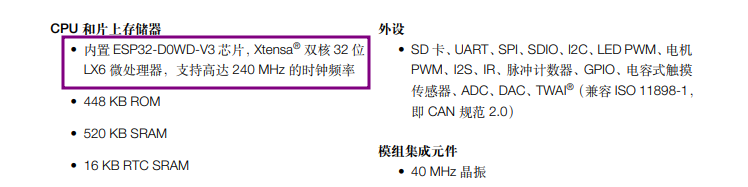
所谓双核指的是ESP32单片机有两个内核,所有的外设都通过一个总线连接到两个内核上,也就是说,程序无论在哪个核上运行都可以操作硬件。
在前面的单片机开发平台介绍中,曾介绍ESP32的官方开发平台ESP-IDF的核心其实是基于开源的FreeRTOS优化而来的,而ESP32-Arduino则是对ESP-IDF的进一步封装,所以毋庸置疑,ESP32-Ardunio也是支持FreeRTOS的。
二、双核打印实验
接下来我们通过一个双核打印小实验来测试是否可以使用双核。
开始之前你需要了解两个函数
xPortGetCoreI()获取当前程序所运行的内核ID,ID有0和1xTaskCreatePinnedToCore启动一个TASK并将其绑定到指定ID的内核,ID有0和1
新建example17_micoros2core,修改platformio.ini,提高主频
; PlatformIO Project Configuration File
;
;   Build options: build flags, source filter
;   Upload options: custom upload port, speed and extra flags
;   Library options: dependencies, extra library storages
;   Advanced options: extra scripting
;
; Please visit documentation for the other options and examples
; https://docs.platformio.org/page/projectconf.html

[env:featheresp32]
platform = espressif32
board = featheresp32
framework = arduino
board_build.f_cpu = 240000000L
board_microros_transport = wifi
lib_deps =
    https://gitee.com/ohhuo/micro_ros_platformio.git
测试代码如下
#include <Arduino.h>
/**
 * @brief MicroROSTASK,打印ID
 *
 * @param param
 */
void microros_task(void *param)
{
  while (true)
  {
    delay(1000);
    Serial.printf("microros_task on core:%d\n", xPortGetCoreID());
  }
}

void setup()
{
  Serial.begin(115200);
  /**
   * @brief 创建一个人物在Core 0 上
   * microros_task    任务函数
   * "microros_task"  任务名称
   * 10240      任务占用内存大小
   * NULL         任务参数,为空
   * 1               任务优先级
   * NULL     任务Handle可以为空
   * 0                 内核编号
   */
  xTaskCreatePinnedToCore(microros_task, "microros_task", 10240, NULL, 1, NULL, 0);
}

void loop()
{
  delay(1000);
  Serial.printf("loop on core:%d\n", xPortGetCoreID());
}
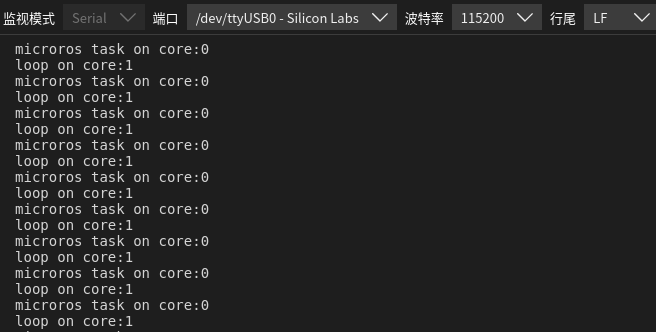
测试结果
三、MicroROS双核实验
编写代码,在上节的代码稍微做些修改即可。
#include <Arduino.h>
#include <micro_ros_platformio.h>
#include <WiFi.h>
#include <rcl/rcl.h>
#include <rclc/rclc.h>
#include <rclc/executor.h>

rclc_executor_t executor;
rclc_support_t support;
rcl_allocator_t allocator;
rcl_node_t node;

/**
 * @brief MicroROSTASK,打印ID
 *
 * @param param
 */
void microros_task(void *param)
{
  // 设置通过WIFI进行MicroROS通信
  IPAddress agent_ip;
  agent_ip.fromString("192.168.2.105");
  // 设置wifi名称,密码,电脑IP,端口号
  set_microros_wifi_transports("fishbot", "12345678", agent_ip, 8888);
  // 延时时一段时间,等待设置完成
  delay(2000);
  // 初始化内存分配器
  allocator = rcl_get_default_allocator();
  // 创建初始化选项
  rclc_support_init(&support, 0, NULL, &allocator);
  // 创建节点 microros_wifi
  rclc_node_init_default(&node, "microros_wifi", "", &support);
  // 创建执行器
  rclc_executor_init(&executor, &support.context, 1, &allocator);
  while (true)
  {
    delay(100);
    Serial.printf("microros_task on core:%d\n", xPortGetCoreID());
    // 循环处理数据
    rclc_executor_spin_some(&executor, RCL_MS_TO_NS(100));
  }
}

void setup()
{
  Serial.begin(115200);
  /**
   * @brief 创建一个人物在Core 0 上
   * microros_task    任务函数
   * "microros_task"  任务名称
   * 10240      任务占用内存大小
   * NULL         任务参数,为空
   * 1               任务优先级
   * NULL     任务Handle可以为空
   * 0                 内核编号
   */
  xTaskCreatePinnedToCore(microros_task, "microros_task", 10240, NULL, 1, NULL, 0);
}

void loop()
{
  delay(1000);
  Serial.printf("do some control on core:%d\n", xPortGetCoreID());
}
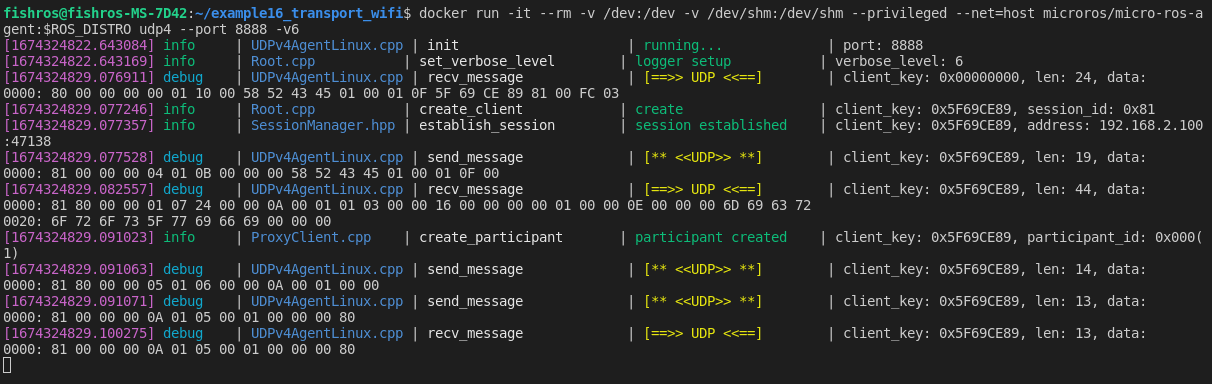
下载后,运行Agent即可测试
docker run -it --rm -v /dev:/dev -v /dev/shm:/dev/shm --privileged --net=host microros/micro-ros-agent:$ROS_DISTRO udp4 --port 8888 -v6
四、总结
本节通过配置和启动新任务成功开启了另一内核并完成MicroROS相关的传输。你可能会问使用双核240M有什么坏处,坏处就是耗电,不过相比我们的电池来说是不值一提的。