datetime:2023/10/20 10:03
author:nzb
该项目来源于大佬的动手学ROS2
3.学会面向对象编程-封装IMU驱动
上一节我们成功读取到了IMU的数据,其中角度用欧拉角的方式表示的,在我们机器人世界里姿态的表示往往使用四元数表示(如果不清楚他们之间的关系可以回看第六章机器人学篇),所以我们需要将欧拉角转换成四元数。除此之外我们还需要将其坐标系矫正到右手坐标系。
所以本节我们将通过面向对象的方式将IMU驱动进行封装,并为其添加坐标系转换以及四元数转换函数。
一、理论介绍
1.1.欧拉角转四元数
欧拉角转四元数的公式我们在第六章入门篇第三节有介绍,这里回顾一下
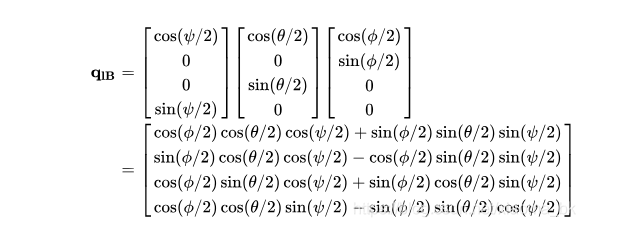
根据公式我们可以写出代码
typedef struct
{
    float w;
    float x;
    float y;
    float z;
} quaternion_t;

Euler2Quaternion(float roll, float pitch, float yaw, quaternion_t &q)
{
    double cr = cos(roll * 0.5);
    double sr = sin(roll * 0.5);
    double cy = cos(yaw * 0.5);
    double sy = sin(yaw * 0.5);
    double cp = cos(pitch * 0.5);
    double sp = sin(pitch * 0.5);
    q.w = cy * cp * cr + sy * sp * sr;
    q.x = cy * cp * sr - sy * sp * cr;
    q.y = sy * cp * sr + cy * sp * cr;
    q.z = sy * cp * cr - cy * sp * sr;
}
1.2 坐标系校准
我们采用右手坐标系,接着我们依次来校准角度数据的方向。
打开终端,点击RST,查看IMU数据。
首先是X轴,我们让开发板上爱神丘比特的剑头指向自己,然后从右侧往左侧倾斜。
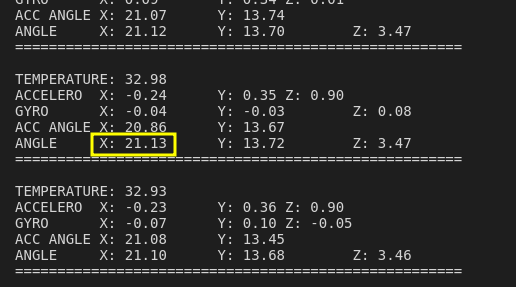
可以看到此时X轴为正值,符合右手坐标系法则。
接着是Y轴,平放,将箭头朝向自己的胸口,接着抬高板子,让箭头指向自己的头部,观察Y轴的变化。
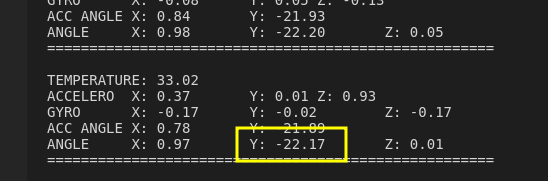
Y轴为负值,不符合右手坐标系法则,所以Y的值应该取一次负,使其为正。
接着是Z轴,平放,将箭头朝向自己的胸口,然后逆时针旋转板子,观察数值变化。
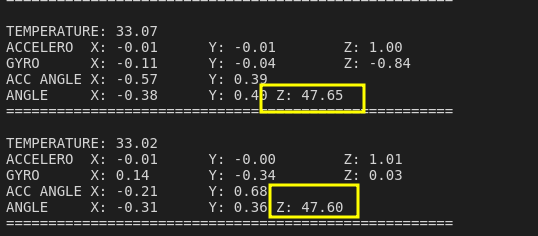
值为正,表示符合右手坐标系法则。
你可能会问怎么确认怎样旋转是正,怎样旋转是负,首先要确认轴向,我们开发板的Z轴朝上,X轴朝前,此时Y轴应该朝左。接着摊开右手手掌,用大拇指朝向轴的方向,比如朝向X轴,然后握起手掌,那么你握的方向就是正方向。
二、开始写代码
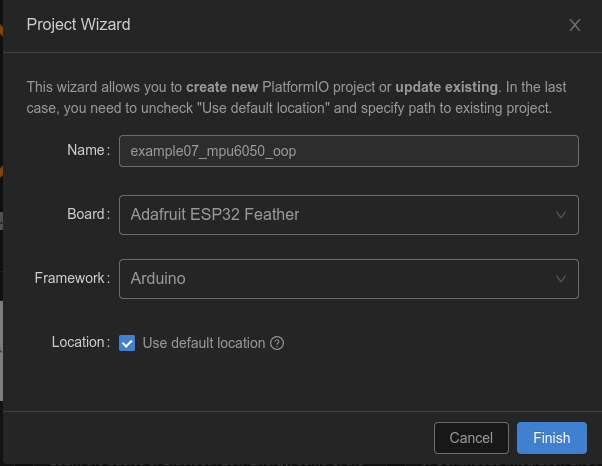
新建工程example07_mpu6050_oop
接着为其添加依赖
修改platformio.ini
[env:featheresp32]
platform = espressif32
board = featheresp32
framework = arduino
lib_deps =
    https://ghproxy.com/https://github.com/rfetick/MPU6050_light.git
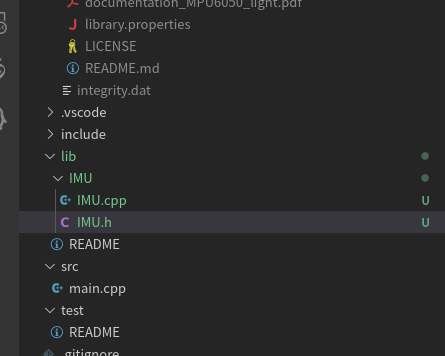
接着在lib下新建IMU文件夹,并在文件夹下新建IMU.h和IMU.cpp
IMU.h
#ifndef __IMU_H__
#define __IMU_H__
#include "Wire.h"
#include "MPU6050_light.h"

typedef struct
{
    float w;
    float x;
    float y;
    float z;
} quaternion_t; // 四元数结构体

typedef struct
{
    float x;
    float y;
    float z;
} vector_3d_t; // 通用3D点结构体

typedef struct
{
    quaternion_t orientation;
    vector_3d_t angle_euler;
    vector_3d_t angular_velocity;
    vector_3d_t linear_acceleration;
} imu_t; // IMU数据结构体

class IMU
{
private:
    MPU6050 *mpu_; // mpu6050指针

public:
    /**
     * @brief MPU6050构造一个新的IMU对象
     *
     * @param mpu
     */
    IMU(MPU6050 &mpu);

    ~IMU() = default;
    /**
     * @brief 初始化函数
     *
     * @param sda 引脚编号
     * @param scl 引脚编号
     * @return true
     * @return false
     */
    bool begin(int sda, int scl);
    /**
     * @brief 欧拉角转四元数
     *
     * @param roll 输入X
     * @param pitch 输入y
     * @param yaw 输入Z
     * @param q  返回的四元数引用
     */
    static void Euler2Quaternion(float roll, float pitch, float yaw, quaternion_t &q);
    /**
     * @brief 获取IMU数据函数
     *
     * @param imu
     */
    void getImuData(imu_t &imu);
    /**
     * @brief 更新IMU数据,同上一节中的mou.update
     *
     */
    void update();
};

#endif // __IMU_H__
IMU.cpp
#include "IMU.h"

IMU::IMU(MPU6050 &mpu)
{
    mpu_ = &mpu;
};

bool IMU::begin(int sda, int scl)
{
    Wire.begin(sda, scl);
    byte status = mpu_->begin();
    Serial.print(F("MPU6050 status: "));
    Serial.println(status);
    if (status != 0)
    {
        return false;
    } // stop everything if could not connect to MPU6050

    Serial.println(F("Calculating offsets, do not move MPU6050"));
    delay(1000);
    // mpu.upsideDownMounting = true; // uncomment this line if the MPU6050 is mounted upside-down
    mpu_->calcOffsets(); // gyro and accelero
    Serial.println("Done!\n");
    return true;
}

void IMU::Euler2Quaternion(float roll, float pitch, float yaw, quaternion_t &q)
{
    double cr = cos(roll * 0.5);
    double sr = sin(roll * 0.5);
    double cy = cos(yaw * 0.5);
    double sy = sin(yaw * 0.5);
    double cp = cos(pitch * 0.5);
    double sp = sin(pitch * 0.5);
    q.w = cy * cp * cr + sy * sp * sr;
    q.x = cy * cp * sr - sy * sp * cr;
    q.y = sy * cp * sr + cy * sp * cr;
    q.z = sy * cp * cr - cy * sp * sr;
}

void IMU::getImuData(imu_t &imu)
{
    imu.angle_euler.x = mpu_->getAngleX();
    imu.angle_euler.y = -mpu_->getAngleY();
    imu.angle_euler.z = mpu_->getAngleZ();

    imu.angular_velocity.x = mpu_->getAccAngleX();
    imu.angular_velocity.y = -mpu_->getAccAngleY();
    imu.angular_velocity.z = mpu_->getGyroZ();

    imu.linear_acceleration.x = mpu_->getAccX();
    imu.linear_acceleration.y = mpu_->getAccY();
    imu.linear_acceleration.z = mpu_->getAccZ();

    IMU::Euler2Quaternion(imu.angle_euler.x, imu.angle_euler.y, imu.angle_euler.z,
                          imu.orientation);
}

void IMU::update()
{
    mpu_->update();
}
main.cpp
#include <Arduino.h>
#include "IMU.h"

MPU6050 mpu(Wire); // 初始化MPU6050对象
IMU imu(mpu);      // 初始化IMU对象

imu_t imu_data;
unsigned long timer = 0;

void setup()
{
  Serial.begin(115200);
  imu.begin(18, 19); // 初始化IMU,使用18,19引脚
}

void loop()
{
  imu.update();
  if ((millis() - timer) > 100)
  {
    imu.getImuData(imu_data); // 获取IMU数据结构体
    Serial.printf("imu:\teuler(%f,%f,%f)\n",
                  imu_data.angle_euler.x, imu_data.angle_euler.y, imu_data.angle_euler.z);
    Serial.printf("imu:\torientation(%f,%f,%f,%f)\n",
                  imu_data.orientation.w, imu_data.orientation.x, imu_data.orientation.y, imu_data.orientation.z);
    timer = millis();
  }
}
对于代码的解释已经放到了注释之中。
编译下载后,你将看到
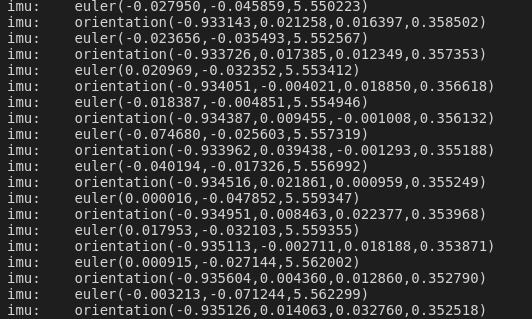
三、总结
本节我们通过对MPU6050驱动的封装,学习了如何在嵌入式上使用面向对象编程的方法,下一节我们继续尝试使用开源库来驱动OLED模块,让我们的显示器亮起来。.